When you started your business, maybe you were able to just check in the closet or the garage to see what inventory you had on hand. But now that your business has grown, that approach probably isn’t working so well any more.
Are you tired of running out of stock but never have enough time to check its levels? Or have you ever forgotten about unsold items that were tucked away in a corner? Have you ever disappointed a good customer, or missed an opportunity to sell to a new one because you didn’t know what you had in stock? If any of these scenarios sound familiar, you need inventory-tracking.
QuickBooks can help you create thorough records for each product you sell. It keeps track of how much you have on hand and warns you when your stock is running low. And the reports tell you what’s selling and what’s not, so you can make better, smarter purchasing decisions.
Activate the inventory-tracking function
Before you get started creating item records and including them in transactions, you need to make sure that QuickBooks is set up to start tracking. Open the Edit menu and click Preferences. Click Items & Inventory in the left vertical pane and then select the Company Preferences tab. This window will open:
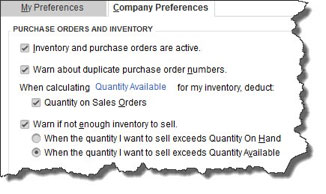
QuickBooks needs to know what your intentions are when it comes to inventory-tracking.
First, of course, click in the box to the left of Inventory and purchase orders are active if it isn’t already checked. Click the next box down if applicable. The rest of this window deals with two concepts you need to understand. Quantity on Hand refers to the number of items that you actually have. Quantity Available subtracts items currently on Sales Orders. QuickBooks will warn you if you don’t have enough of a specific item to commit to a customer. You just have to decide which definition of Quantity you want to use.
When you’re done here, click OK.
Accuracy matters
Now you can start entering records for the products you sell. Accuracy is absolutely essential here. You’ll see why as you explore QuickBooks’ tracking capabilities.
There are a few ways to open an item record window. You can click Items & Services in the upper right corner of the Home Page, or open the Lists menu and select Item List. Both will open a window displaying any item records that have been entered in a register-type view. Right-click anywhere and select New, or click the arrow next to Item in the lower left corner and select New.
Double- and triple-check your work as you enter information in the QuickBooks item record window.
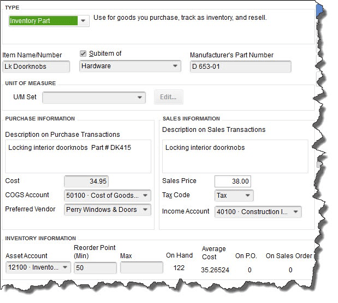
QuickBooks lets you create records for numerous types of items, including Service, Discount and Inventory Assembly. To see how inventory-tracking works, select Inventory Part from the drop-down menu under TYPE. Next, enter an Item Name/Number in that field.
If you’ve already named a main category (like Hardware, in the example above) and want to place your product in a subcategory of it, click the Subitem of box and choose from the drop-down list. Manufacturer’s Part Number is optional. You can ignore UNIT OF MEASURE if this isn’t an option in your version of QuickBooks.
Purchase information
If you buy this item from a vendor, fill in this side of the window. Write the description that should appear on purchase transactions when you place an order. Enter the cost you pay for it, and select the COGS (Cost of Goods Sold) account if the default isn’t correct. Do you buy this product exclusively from one supplier? Select the name in the drop-down menu under Preferred Vendor.
Sales information
Enter the description you’d like customers to see on invoices and the price you’ll charge. If you’re at all unsure of what to select for Tax Code or Income Account, we can go over your chart of accounts with you and explain how its accounts are used in records and transactions.
Inventory information
Here’s where the software’s tracking capabilities come in. QuickBooks will probably default to your Inventory Asset account, which is fine. Enter the minimum number of items that should be in stock when you get a reminder to reorder, and the maximum you want to have at any one time.
What about the stuff you already have? If you already have inventory “on hand” when you start using the inventory management function, this part can get a little tricky. But, never fear, we’re here to help if you need us.
Your first inclination would probably be to count the inventory you currently have and enter it in the On Hand field. BUT, the best practice for accounting purposes would be to not enter anything in the “on hand” field when you set up an inventory item. You should record the purchase of the inventory through a bill when you purchase it. The On Hand field posts the inventory amount, and the offset is opening balance equity. This approach would require you to then move the amount in opening balance equity to wherever you would have posted the inventory purchase when you posted it originally, assuming it was purchased before you started tracking inventory in QuickBooks. (I promise we can help you do this part right.)
Once you’re using QuickBooks as your inventory management tool, it will automatically calculate the Total Value of your inventory based on the amount you have on hand and what you paid for it.
In the screen shot above, you see an example of what that last line looks like once you start using that item in transactions. You’ll see its Average Cost and the number that are currently on purchase orders and sales orders.
Invest the time; reap the benefits
Creating records for every product you sell can be tedious, time-consuming work. But the payoff comes in the real-time knowledge you’ll have of your inventory and the smarter purchasing decisions you’ll be able to make. As always, we’re ready to help.
KraftCPAs can help.
Call us at 615-242-7351 or complete the form below to connect with an advisor.