What’s your first impression when you get a sloppy, unprofessional invoice from a vendor? You might wonder if they’re equally careless with their approach to products and services.
Appearance matters when it comes to the forms and other documents you share with customers and suppliers, so make them the best they can be. It’s a small thing to do that can make a positive impression.
Much of the interaction you have with your business contacts involves money. It makes sense, then, that QuickBooks contains tools that can help you create a design for your forms that can be consistent. Your invoices can look like your purchase order and your sales receipts can resemble your estimates. Here’s a look at a few options.
Getting Started
QuickBooks’ form customization tools allow you to control two things: how your forms look and what they include. You can modify the templates included for your invoices, estimates, sales receipts, statements, purchase orders, and bill payment stubs so they all look similar.
To get started, you’ll need to select one of the templates that QuickBooks supplies. Open the Lists menu and select Templates. In the window that opens, double click one of the templates, like Intuit Service Invoice. Click Manage Templates at the top of the window. It’s a good idea to leave the original template intact, so you should make a copy of the template that you can modify and save. If you’d rather edit the original template, though, click OK. Otherwise, click Copy, then OK. The Basic Customization window will open.
Making Design Changes
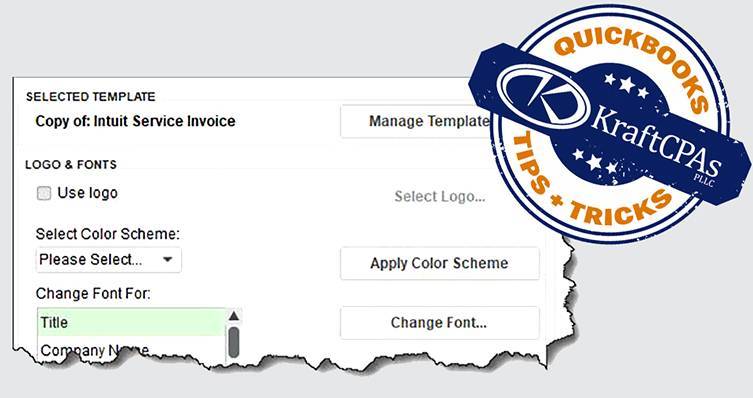
The left side of this window displays all of your design and content options. First, add your logo if you have one by clicking the Use logo box and locating it in the directory of your computer that comes up. (If you don’t have a company logo, you can create one easily and sometimes free online.)
Next, select a color scheme for your invoice by clicking the down arrow below Select Color Scheme. Click Apply Color Scheme. You can see how that would look in the right side of the window, which displays a preview as you make changes. If you want to change the fonts for your header (Title, Company Name, etc.), click each element and then click Change Font. A window containing your options here will open.
Altering Information
When you’re done with fonts, you can choose Company and Transaction Information and indicate your preferences by checking and unchecking boxes. If you get a message warning you about overlapping fields, you will have to go into the Layout Designer, where you can drag and drop your form elements around to make them fit (this isn’t particularly easy if you’ve never worked with a design tool before).
So far, you’ve only modified the very top of your invoice. You also have control over the rest of it. Click Additional Customization to see what your options are here. The window that opens contains a field selection pane on the left and a preview of your work-in-progress on the right again. There are five areas to consider. You can change the field label for each and indicate whether they should appear on the screen and/or the printed copy. The three you should be most concerned with are:
Header. More options for the top of the form, like Due Date and Ship Via
Columns. Which columns should appear in the center of the invoice (Description, Quantity, Rate, etc.)?
Footer. You’ll certainly want to add some of these, like Subtotal and Total, and maybe Sales Tax.
When you’re done customizing here, click OK, then OK again in the Basic Customization window. Your newly designed invoice will now appear in the list of templates.
Making Them Uniform
You can copy the design of one form to another to make them consistent. Go to Lists | Templates again and highlight the form you want to copy (like Copy of Service Invoice). Click the Templates button in the lower left to open the menu and select Duplicate. In the window that opens, select the type of template you want to copy to (like Sales Receipt). Click OK. When the Templates window opens again, you’ll see a Copy 2: Intuit Service Invoice. In the corresponding Type column, you’ll see Sales Receipt. You can make any adjustments necessary here.
QuickBooks is not a graphic design program, and most business owners aren’t professional graphic designers. If you’re going to use the tools, we suggest you keep your modifications simple. By all means, add a logo and work with the color scheme and fonts and maybe add or delete a few fields. But if you do too much, you risk getting tangled up in the Layout Designer.
Because first impressions count, it’s just good practice to make your forms’ designs look uniform throughout your business. Thankfully, QuickBooks makes it a little easier.
© 2023 KraftCPAs PLLC
Get news, analysis, and ideas to help you make sound financial decisions