Chances are that your business at times relies on invoices to get paid, and that means the you’ll sometimes need to create and send statements. Naturally, you expect to receive a timely payment for goods or services you’ve sold.
That probably works most of the time. But what happens when you’ve sent a reminder and are still waiting? And what do you do when a customer orders frequently and is confused about what’s been paid and what hasn’t?
If you use QuickBooks Online, you can easily send a statement, a list of sales transactions, credits, and payments. There are three kinds of these:
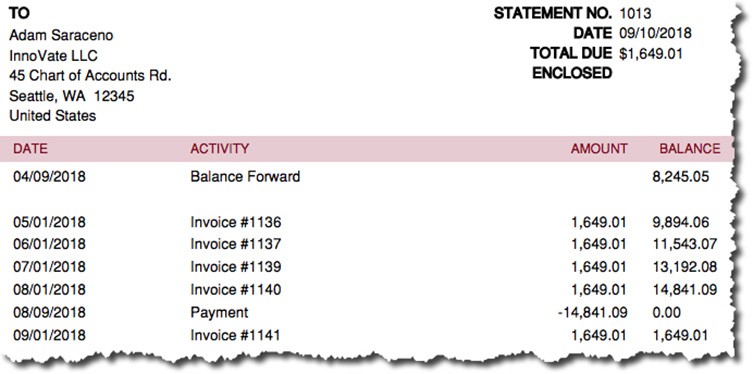
- Balance forward. This document emphasizes what’s currently owed by displaying it at the top. Below that is a list of sales transactions that occurred between two dates you specify.
- Open item. You select a date, and the statement shows all transactions that were completed before it.
- Transaction statement. There’s no total balance here, just the amounts billed and received for every transaction.
Setting up statements
Balance Forward statements cover a period of transactions that you define.
There are three ways to create statements. You can:
- Click the Plus (+) icon at the top of the screen.
- Dispatch one while you’re in a customer record.
- Launch a batch action from the Customer
Before you create your first statement, though, make sure QuickBooks Online is set up the way you want it to be. Click the gear icon in the upper right of the screen and select Your Company Account and Settings. Click the Sales tab and scroll down to Statements. Click Statements to open the options there.
You can List each transaction as a single line or List each transaction including all detail lines. Click the button in front of the one you prefer. If you want to Show aging table at bottom of statement, click in the box. This will show customers how many days each transaction is overdue.
Click Save when you’re done.
Creating statements
If you’ve already started entering transactions so there’s some data in QuickBooks Online, click the Plus (+) icon in the upper right corner of the screen.
Tip: If you don’t see the Plus (+) icon, you’re in an active screen. Click the X in the upper right to close it, saving it first if necessary.
Click Statement, which is located under Other on the far right. Under Statement Type, select Balance Forward. Below that is the Customer Balance Status field. Do you want to see customers with open balances, those who have overdue invoices, or all customers? The third option will include credit memos.
Indicate a Start Date and End Date Click Apply. QuickBooks Online will display a list of matching customers. Click Print or Preview at the bottom of the screen to see your statements.
From this screen, you can either Print the statements or Close to go back to the previous page, where you can Save and Send.
The other options
There are two other ways to create statements. Click Sales in the left vertical toolbar and highlight the Customers tab by clicking on it. Hover your cursor over a customer and click the down arrow at the very end of that line. From the list that opens, select Create statement.
You can also hand-pick multiple customers to receive statements. With the Customers window open, click in the box in front of your choices, and then click the down arrow next to Batch actions at the top of the list. Select Create statements.
The mechanics of creating statements in QuickBooks are simple. But you don’t want to send an inaccurate one to a customer. Make sure your transactions are up to date before you generate any statements and choose your date ranges carefully.
As always, KraftCPAs is available to help with this task or any other area of QuickBooks Online that might be confusing to you. We’re here to help you be pro-active to avoid problems in the long run.
© 2018
KraftCPAs can help.
Call us at 615-242-7351 or complete the form below to connect with an advisor.